Closed-circuit television (CCTV) uses video cameras to transmit signals to specific monitors. It differs from broadcast television in that the signal is not openly transmitted, though it may employ point-to-point wireless links. CCTV is often used for surveillance in areas that need security,such as banks, casinos, shops, departmental stores and airports or military installations.
Here is a remote-controlled CCTV switcher circuit to monitor six cameras on a single or dual monitor/TV.
The salient features of this switcher are:
 The circuit:
Fig. 2 shows the main control circuit of the camera switcher. In this circuit, PIC16F72 microcontroller controls all the functions such as interfacing/ initializing the LCD to display all the desired characters on the screen decoding the RC-5 command on pressing the required keys of the remote control and providing high logic to enable corresponding bilateral CMOS analogue switches to connect the video signal from cameras to the video-out- put socket and audio signals to the power amplifier of the corresponding camera selected from the remote. Here we have used the remote control of an LG TV (remote code No. 6710V00079B). It is readily available in the market.
A remote sensor is connected to port RB0 (pin 21), called interrupt port, of the controller and the software initializes interrupt routines along with timer-0 interrupt to decode the RC-5 command.
Any transmission from the remote consists of two start bits, one toggle bit, 5-bit address and 6-bit command. Here we have not used the 5-bit address. A biphase-modulated bit can be thought of as two separate bits that are always the inverse of each other. A logical zero is represented by a ‘10’ pattern on the IR input, while a logical one is represented by a ‘01’ pattern. That is basically used to decode the received message.
Toggle bit is a particular property of the RC-5 protocol. This bit changes polarity every time you press a key and will remain unchanged as long as you hold the key. That enables the receiver to detect released keys, which helps to eliminate key bounces. We have also used this bit to detect so that if any key is kept pressed for a long time, the routine detects the command once, keeps the value in a general-purpose register called ‘pass- dummy’ (refer to ‘.asm’ file), and does not process and store any further command till the remote key is released. The stored RC-5 command value in register ‘pass dummy’ is used to perform the necessary function given in the source code.
The LCD shows the camera number selected from the remote and mode of operation (auto/manual). For camera-hold time set for auto mode and other display text information, please see the LCD screenshot in Fig. 3. Use of the LCD makes the project more user-friendly.
All the cameras are to be connected to SK1 through SK6 (5-pin DIN connector) as shown in the circuit diagram. The extreme right and left pins are for 12V positive and negative supply (to be fed from the regulated power supply of the main switcher)for the built-in camera module. The 12V power supply is permanently connected to all the cameras. Audio and video signals from the cameras are selected using switch pairs S2a- S2b through S7a-S7b (built inside IC2 through IC4) and fed to the audio power amplifier and video output sockets, respectively.
Each IC has four CMOS bilateral switches for transmission or multiplexing of analogue or digital signals. It is pin-to-pin compatible with IC CD4016, but has much lower ‘on’ resistance, which is relatively constant over the input signal range.
Video and audio signals from SK1 (camera 1) are connected to S2a and S2b, respectively, and both the enable pins (to switch on both the switches) are shorted out and connected to port RC7 (pin 18) of the microcontroller. Similarly, audio and video signals from SK2 through SK6 are connected to IC2 through IC4 and then to Port C of IC1 as shown in Table I.
Enable pins of switch pairs S2a-S2b, S3a-S3b, S4a-S4b, S5a-S5b, S6a-S6b and S7a-S7b of IC2 through IC4 are shorted to each other and fed to the corresponding port of Port C as shown in Table I. The microcontroller provides high logic at Port-C pins to switch on a particular camera. The truth table for Port C is shown in Table II.
Immediately after switching on the mains, the standby LED (LED7) connected to Port-C pin RC3 glows and the LCD shows the welcome page (refer to the LCD screenshot).
On pressing the power key on the remote, the standby LED turns off and the LCD shows which camera is ‘on,’ in which mode it is now and default hold time for the corresponding cam- era in ‘Auto’ mode.
As described above, pins of Port C (RC0, RC1, RC4-RC7) are connected to IC2 through IC4 for selecting the cam- era to be switched on. LED1 through LED6 are used to check the logic status of Port C. Pressing keys ‘1’ through ‘6’ on the remote makes the corresponding LEDs (LED1 through LED6) glow, indicating ‘on’ condition of the cam- eras (CAM-1 through CAM-6).
Here a 16-character, 2-line LCD is used in 4-bit mode. Data lines D4 through D7 of the LCD are connected to Port-B pins RB4 through RB7. En- able (EN) and reset (RS) pins are con- nected to RB2 and RB3 pins, respectively, and the read/write (R/W) pin is connected to ground as we have used the LCD in writing mode only. Preset VR1 (10-kilo-ohm) is used for setting the LCD character contrast.
Power Supply:
A simple circuit for regulated supply (shown in Fig. 4) is used here. The +12V regulated output is used to power all the six cameras, IC2 through IC4 and IC5 and fed to another 7805 voltage regulator (IC7) to get the regulated +5V output for the microcontroller (IC1) and the LCD.
The current rating of the trans- former should be around 2A, depending on the current consumption of the cameras. Use a good-quality heat-sink for both the regulators.
Power Amplifier:
A simple power amplifier (see Fig. 5) is used to amplify the sound signal from the cameras and hear it on a small speaker.
The audio power amplifier is built around IC UTC820 (IC5). UTC820 is a monolithic integrated circuit audio amplifier delivering an output of 1.2 watts at 9V on an 8-ohm speaker load with 10 per cent total harmonic distortion (THD) and good ripple rejection. It is designed for audio-frequency class-B amplifier with a wide operating supply voltage range of 3V to 14V and minimum external components.
The pin configuration of IC UTC820 is shown in Fig. 6. Components at pin 2 of the IC5 decide closed-loop voltage gain (dB) of the amplifier. Here a 47-ohm resistor (R11) and a 22µF capacitor (C12) are used and, with these values, about 45dB closed-loop voltage gain is achieved. You can reduce the component values for more gain but it’s not required here as maximum gain of 75 dB is possible. Capacitor C10 (100µF) connected between pins 5 and 7 of IC5 is used for bootstrap and improving the low-frequency signal. The amplifier output at pin 5 is connected to the speaker via C13. The audio signal from the cameras is fed to input pin 3 of the IC via volume control VR2 (10-kilo-ohm), capacitor C17 and resistor R13. Here the output power is limited to about 500 mW at 8-ohm load approximately, so use of a good-quality 6.4cm speaker is recommended.
Function of remote control key:
The functions of various remote keys are shown in Fig. 7.
On each successive pressing of the time set-down key, the time decre- ments up to zero. If you set 0-second time for any camera, the switcher by- passes this camera during selection in auto mode. For example, if you set the time as 0-second for camera-3, in auto mode, the switcher selects camera-1, camera-2, camera-4, camera-5 and camera-6. Here the switcher bypasses camera-3. This function is useful if you want to skip certain cameras.
After assembling the circuit without microcontroller, apply the power using ‘on’/’off’ switch S1. Check the DC voltage at pin 3 of regulator IC7. It should be +5V. Check the same voltage at pins 1 and 20 of the base of IC1.
Now, switch off the power, insert the microcontroller in its base and recheck all the connections from the PCB to the LCD and IR sensor TSOP1738. On applying the power, page-1 and page-2 text should display on the LCD screen. Using the remote, switch on the switcher and change the functional sta- tus on the LCD by referring to CCTV switcher remote commander (shown in Fig. 7) and LCD screenshots (shown in Fig. 3).
Adjust VR1 for maximum contrast on the LCD. If you don’t get any output on the LCD, troubleshoot as follows:
Once the LCD shows page-1 and page-2 text properly and the remote commander is working, switch off the power and then switch it on again using S1. Now the LCD should show page-1 and page-2 as shown in Fig. 3. At the same time, pin 14 of the MCU should go high (+5V) and the power standby LED should glow. Now press ‘Power’ key on the remote. Pin 14 of the MCU should go low and the standby LED should turn off, and vice versa, on pressing the same key again. If this doesn’t happen, replace the microcontroller.
Connect LED1 through LED6 to connector CON1. Press ‘Power’ key on the remote to switch on the switcher. Page-3 text should appear on the LCD, showing camera-1 is ‘on,’ the switcher is in manual mode and the default time of camera hold for auto mode. At the same time, Port-C pin RC7 should go high and LED1 should glow. Select other cameras either by pressing keys 1 through 6 or camera up/down keys of the remote and check whether the corresponding LEDs (LED1 through LED6) are glowing (refer to Port-C truth table). Simultaneously, page-3 should show the corresponding camera number accordingly. If the LEDs don’t glow according to the truth table, replace the microcontroller.
When camera-1 is selected, the LCD should show camera-1 and LED1 should glow. If the monitor does not show the video of camera-1, or you hear no audio from the power amplifier, check 5V logic at pins 5 and 6 of IC4. If there is no voltage at these pins, check the availability of 0.6V at the base of transistor T5, +5V at its emitter and +12V at its collector. Follow the same procedure for all other cameras and their corresponding switching circuits.
Software:
The source program is written in Assembly language and compiled using MPASM tool suite.
Here is a remote-controlled CCTV switcher circuit to monitor six cameras on a single or dual monitor/TV.
The salient features of this switcher are:
- Cameras: Six cameras with one way audio (audio incoming only).
- Operation: Fully remote controlled (infrared commander).
- Front display: LCD to display the camera selected and all other functions/parameters.
- Camera selection: Manual (you can select any camera of your choice by pressing number keys or camera up/down keys on the remote) and auto (the switcher selects the cameras one by one and holds videos of each camera till the preprogrammed time).
- Auto mode: You can change ‘on’ time of each camera (hold time) individually through the remote. Time can be programmed from 0 to 255 seconds.
- Camera bypass: You can set any camera in bypass mode by entering 0-second ‘on’ time for cameras which you want to bypass or don’t want to watch during auto mode.
- Audio: One-way audio. In this model, you can hear the audio from the camera selected by the switcher.
- Video: Two video out RCA sockets with 75-ohm impedance 1Vp-p are available at the rear panel of the master unit. You can connect two monitors in these sockets.
- Other features: Wide input voltage range, long-range infrared remote commander, microcontroller-based design supported with CMOS digital integrated circuits, liquid-crystal display to monitor the status and bilateral digital MOS switches for switching the analogue video/audio signals from cameras.

Fig. 2 shows the main control circuit of the camera switcher. In this circuit, PIC16F72 microcontroller controls all the functions such as interfacing/ initializing the LCD to display all the desired characters on the screen decoding the RC-5 command on pressing the required keys of the remote control and providing high logic to enable corresponding bilateral CMOS analogue switches to connect the video signal from cameras to the video-out- put socket and audio signals to the power amplifier of the corresponding camera selected from the remote. Here we have used the remote control of an LG TV (remote code No. 6710V00079B). It is readily available in the market.
A remote sensor is connected to port RB0 (pin 21), called interrupt port, of the controller and the software initializes interrupt routines along with timer-0 interrupt to decode the RC-5 command.
Any transmission from the remote consists of two start bits, one toggle bit, 5-bit address and 6-bit command. Here we have not used the 5-bit address. A biphase-modulated bit can be thought of as two separate bits that are always the inverse of each other. A logical zero is represented by a ‘10’ pattern on the IR input, while a logical one is represented by a ‘01’ pattern. That is basically used to decode the received message.
Toggle bit is a particular property of the RC-5 protocol. This bit changes polarity every time you press a key and will remain unchanged as long as you hold the key. That enables the receiver to detect released keys, which helps to eliminate key bounces. We have also used this bit to detect so that if any key is kept pressed for a long time, the routine detects the command once, keeps the value in a general-purpose register called ‘pass- dummy’ (refer to ‘.asm’ file), and does not process and store any further command till the remote key is released. The stored RC-5 command value in register ‘pass dummy’ is used to perform the necessary function given in the source code.
The LCD shows the camera number selected from the remote and mode of operation (auto/manual). For camera-hold time set for auto mode and other display text information, please see the LCD screenshot in Fig. 3. Use of the LCD makes the project more user-friendly.
 |
| LCD Screenshort |
All the cameras are to be connected to SK1 through SK6 (5-pin DIN connector) as shown in the circuit diagram. The extreme right and left pins are for 12V positive and negative supply (to be fed from the regulated power supply of the main switcher)for the built-in camera module. The 12V power supply is permanently connected to all the cameras. Audio and video signals from the cameras are selected using switch pairs S2a- S2b through S7a-S7b (built inside IC2 through IC4) and fed to the audio power amplifier and video output sockets, respectively.
Each IC has four CMOS bilateral switches for transmission or multiplexing of analogue or digital signals. It is pin-to-pin compatible with IC CD4016, but has much lower ‘on’ resistance, which is relatively constant over the input signal range.
Video and audio signals from SK1 (camera 1) are connected to S2a and S2b, respectively, and both the enable pins (to switch on both the switches) are shorted out and connected to port RC7 (pin 18) of the microcontroller. Similarly, audio and video signals from SK2 through SK6 are connected to IC2 through IC4 and then to Port C of IC1 as shown in Table I.
 |
| Table I |
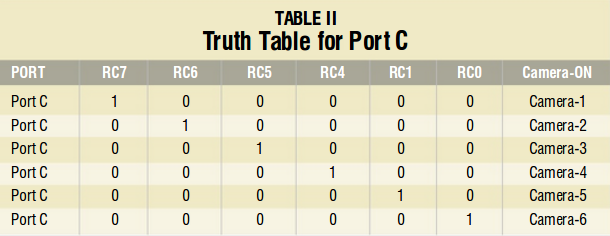 |
| Table II |
On pressing the power key on the remote, the standby LED turns off and the LCD shows which camera is ‘on,’ in which mode it is now and default hold time for the corresponding cam- era in ‘Auto’ mode.
As described above, pins of Port C (RC0, RC1, RC4-RC7) are connected to IC2 through IC4 for selecting the cam- era to be switched on. LED1 through LED6 are used to check the logic status of Port C. Pressing keys ‘1’ through ‘6’ on the remote makes the corresponding LEDs (LED1 through LED6) glow, indicating ‘on’ condition of the cam- eras (CAM-1 through CAM-6).
Here a 16-character, 2-line LCD is used in 4-bit mode. Data lines D4 through D7 of the LCD are connected to Port-B pins RB4 through RB7. En- able (EN) and reset (RS) pins are con- nected to RB2 and RB3 pins, respectively, and the read/write (R/W) pin is connected to ground as we have used the LCD in writing mode only. Preset VR1 (10-kilo-ohm) is used for setting the LCD character contrast.
Power Supply:
A simple circuit for regulated supply (shown in Fig. 4) is used here. The +12V regulated output is used to power all the six cameras, IC2 through IC4 and IC5 and fed to another 7805 voltage regulator (IC7) to get the regulated +5V output for the microcontroller (IC1) and the LCD.
 |
| Fig.4. Power Supply |
Power Amplifier:
A simple power amplifier (see Fig. 5) is used to amplify the sound signal from the cameras and hear it on a small speaker.
 |
| Fig.5. Power Amplifier |
 |
| Fig.6. UTC820 |
Function of remote control key:
The functions of various remote keys are shown in Fig. 7.
 |
| Fig.7. Tv Remote Control |
- Power on/off key. Press it once to switch on the switcher and press again to turn off or keep the switcher in standby mode and vice versa. (AC mains should be ‘on’ in both the cases.)
- Camera selection key. Select any of the six cameras manually by press- ing any of the numerical keys ‘1’ through ‘6’ once. For example, to select camera-3 press ‘3’ on the remote, and to select camera-5 press ‘5’ on the remote.
- Auto/manual. By default, the mi- crocontroller sets the mode of selection to manual. (In that case, you have to select the cameras by pressing the number keys or the camera up/down keys.) To change to automatic selec- tion (auto) mode, press ‘Mute’ key and the switcher selects the cameras one by one automatically. Pressing this key again will return the mode of selection to manual, and vice versa.
- Camera up key (PR∆ key).By pressing the camera-up key, the switcher selects the next camera. For example, if the LCD is showing camera-2, pressing this key once makes the switcher jump to camera-3. Each successive pressing of this key will make the switcher jump to the next camera.
- Camera down key (PR∇ key).By pressing the camera-down key, the switcher selects the preceding camera. For example, if the LCD is showing camera-4, pressing this key once makes the switcher jump back to camera-3. On each successive pressing of this key, the switcher jumps back to the previous camera.
- Time set up/down key (Vol+/ Vol– key). In auto mode, the switcher selects the cameras one by one and the picture of the selected camera is held up for a certain time. By default, the microcontroller sets this hold time as 5 seconds. You can change this time for each camera individually from 0 to 255 seconds.
On each successive pressing of the time set-down key, the time decre- ments up to zero. If you set 0-second time for any camera, the switcher by- passes this camera during selection in auto mode. For example, if you set the time as 0-second for camera-3, in auto mode, the switcher selects camera-1, camera-2, camera-4, camera-5 and camera-6. Here the switcher bypasses camera-3. This function is useful if you want to skip certain cameras.
- Edit key (TV/AV). To change the camera hold-up time for ‘auto mode,’ enter ‘edit’ mode first by pressing this key once and then set the desired time by pressing the time up/down key as described above. To exit edit mode af- ter setting the time, press the same key on the remote once again. The control- ler goes back to manual mode.
After assembling the circuit without microcontroller, apply the power using ‘on’/’off’ switch S1. Check the DC voltage at pin 3 of regulator IC7. It should be +5V. Check the same voltage at pins 1 and 20 of the base of IC1.
Now, switch off the power, insert the microcontroller in its base and recheck all the connections from the PCB to the LCD and IR sensor TSOP1738. On applying the power, page-1 and page-2 text should display on the LCD screen. Using the remote, switch on the switcher and change the functional sta- tus on the LCD by referring to CCTV switcher remote commander (shown in Fig. 7) and LCD screenshots (shown in Fig. 3).
Adjust VR1 for maximum contrast on the LCD. If you don’t get any output on the LCD, troubleshoot as follows:
- No output on the LCD.Switch off the power and check continuity between the LCD and various pins of IC1 and regulator IC as shown in the schematic diagram. If the connections are Ok, switch on the power, vary VR1 and check the voltage at pin 3 of the LCD (0V to 5V).
- No backlight on the LCD.Check the voltage at pin 15 (+5V) and pin 16 (0V) of the LCD.
- Page 1/page 2 is shown on the screen but the remote commander doesn’t work (nothing happens on pressing functional keys of the remote).
Once the LCD shows page-1 and page-2 text properly and the remote commander is working, switch off the power and then switch it on again using S1. Now the LCD should show page-1 and page-2 as shown in Fig. 3. At the same time, pin 14 of the MCU should go high (+5V) and the power standby LED should glow. Now press ‘Power’ key on the remote. Pin 14 of the MCU should go low and the standby LED should turn off, and vice versa, on pressing the same key again. If this doesn’t happen, replace the microcontroller.
Connect LED1 through LED6 to connector CON1. Press ‘Power’ key on the remote to switch on the switcher. Page-3 text should appear on the LCD, showing camera-1 is ‘on,’ the switcher is in manual mode and the default time of camera hold for auto mode. At the same time, Port-C pin RC7 should go high and LED1 should glow. Select other cameras either by pressing keys 1 through 6 or camera up/down keys of the remote and check whether the corresponding LEDs (LED1 through LED6) are glowing (refer to Port-C truth table). Simultaneously, page-3 should show the corresponding camera number accordingly. If the LEDs don’t glow according to the truth table, replace the microcontroller.
When camera-1 is selected, the LCD should show camera-1 and LED1 should glow. If the monitor does not show the video of camera-1, or you hear no audio from the power amplifier, check 5V logic at pins 5 and 6 of IC4. If there is no voltage at these pins, check the availability of 0.6V at the base of transistor T5, +5V at its emitter and +12V at its collector. Follow the same procedure for all other cameras and their corresponding switching circuits.
Software:
The source program is written in Assembly language and compiled using MPASM tool suite.
Download: Code files
Schematic:
 |
| Fig.2. Switcher Circuit for CCTV Cameras |
Component Required:
IC1, PIC16F72 microcontroller
IC2-IC4 , CD4046
IC5, UTC820
IC7, 7805
IC6, 78S12
IC5, UTC820
IC7, 7805
IC6, 78S12
D1-D4, 1N4007 diode
T1-T6, BC547
R1, 10 K ohm
R2,R13 2.2-kilo-ohm
R3-R8, 470 ohm
R9,R10, 75 ohm
R15, 47 ohm, 1watt
R11,R16, 47 ohm
R12, 1 ohm
R14,R17-R22, 1K ohm
VR1 10-kilo-ohm potmeter
R9,R10, 75 ohm
R15, 47 ohm, 1watt
R11,R16, 47 ohm
R12, 1 ohm
R14,R17-R22, 1K ohm
VR1 10-kilo-ohm potmeter
VR2, 10-kilo-ohm pot long shaft
C1, 1000μF, 35V electrolyte
C2, 220uF, 40V electrolyte
C2, 220uF, 40V electrolyte
C3,C10,C13,C16, 100uF, 25V electrolyte
C4-C6,C8,C14, 33pF ceramic
C18, 0.1μF,Mylar
C7,C9, 47μF, 16V electrolyte
C11, 680pF Ceramic
C12, 22uF, 25V electrolyte
C15, 220uF, 25V electrolyte
C17, 10uF, 25V electrolyte
C11, 680pF Ceramic
C12, 22uF, 25V electrolyte
C15, 220uF, 25V electrolyte
C17, 10uF, 25V electrolyte
X1, 230V AC primary to 15V, 2A secondary transformer
Xtal, 4 crystal oscillator
S1, DPDT switch
SK1-SK6, 5 pin DIN socket
SK7,SK8, RCA socket
LCD, 16x2 lcd
CON1, 7 pin bergstrip connector
CON2-CON7, 2 pin SIP connector
CON8, 12 pin bergstrip connector
LS, 8 ohm, 6.4cm speaker
Remote, 6710V00079B (LG TV)
LED1-LED6, LED 5mm red
LED7, LED 5mm green
IRx, TSOP1738 Ir receiver
SK7,SK8, RCA socket
LCD, 16x2 lcd
CON1, 7 pin bergstrip connector
CON2-CON7, 2 pin SIP connector
CON8, 12 pin bergstrip connector
LS, 8 ohm, 6.4cm speaker
Remote, 6710V00079B (LG TV)
LED1-LED6, LED 5mm red
LED7, LED 5mm green
IRx, TSOP1738 Ir receiver
No comments:
Post a Comment